# Using the REST API
# Accessing the Sisense API
There are 3 main ways to access the Sisense API:
- Via the interactive documentation (
swagger-UI) that lets you see which APIs exist, what parameters they take, and even lets you try them out. - Via a tool meant to run HTTP requests, such as
postmanorcurl. - Via your own application or script.
For any type of use outside of our documentation, you will need to obtain and use an authentication token, using a process outlined below. To use our internal tool, you will only need to be logged in to Sisense.*
# Using the API documentation
You can open the API reference by following these steps:
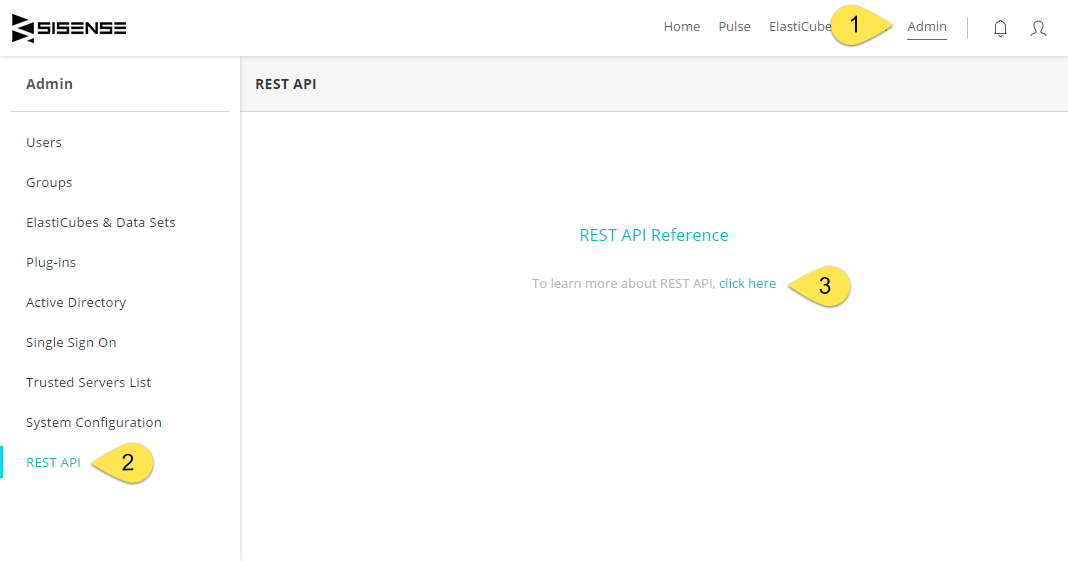
- Open the Sisense Web Application and go to the "Admin" screen.
- Click on the "REST API" tab.
- Click on the blue "REST API Reference" link.
Or by going to the following URL:
- Sisense for Windows 8.1, Sisense for Linux L8.2.1, or later versions:
https://example.com:8081/app/settings#/rest - Older versions of Sisense:
https://example.com:8081/dev/api/docs/#/
(Note: Replace https://example.com:8081/ with the URL of your Sisense server!)
You can select the API version you would like to work with in the top bar (currently, the versions are 0.9 and 1.0) and see the list of existing APIs in each version. Once an API is expanded, you'll be able to see all the functions it supports as well as their request types (GET/POST/PUT/DELETE etc. - detailed below) and the parameters and/or possible results of each.
When using SSL/HTTPS
If you're accessing Sisense via HTTPS, in some versions of Sisense you will have to manually select the HTTPS schema at the top of the Interactive API Reference screen:

# Using a programming language
If you're familiar with javascript and would like to work with the Sisense API from a script, we recommend trying out Node.js (opens new window), but you can use other scripting languages such as Python (opens new window), any non-script language (such as Java or C#) or by sending requests from your web application, using a library that supports ajax requests such as jQuery, etc.
# Using the Sisense API
Below you'll find important information on how to use the Sisense REST API correctly, regardless of the method you choose.
# Authentication
The Sisense REST API requires that you send an authentication token with each request. The token lets the server verify your identity.
In Sisense each user has their own API Token that must be included in the header of the request. This procedure is described below.
# Getting the API Token from User Profiles
Feature Availability
This is a new feature available only from version L2022.3, and is not enabled by default.
Starting from version L2022.3 you can use the User Profiles (opens new window) UI in order to retrieve or renew your API token.

Caution
Exercise caution before regenerating an API token. Integrations using the existing API token stop working until updated with the new token.
# Getting the API Token from the Authentication API
- In the Sisense Application, select Admin > REST API.
- Click REST API Reference to view the list of operations and API documentation.
- Access the endpoint in v1 of the REST API at POST /api/v1/authentication/login
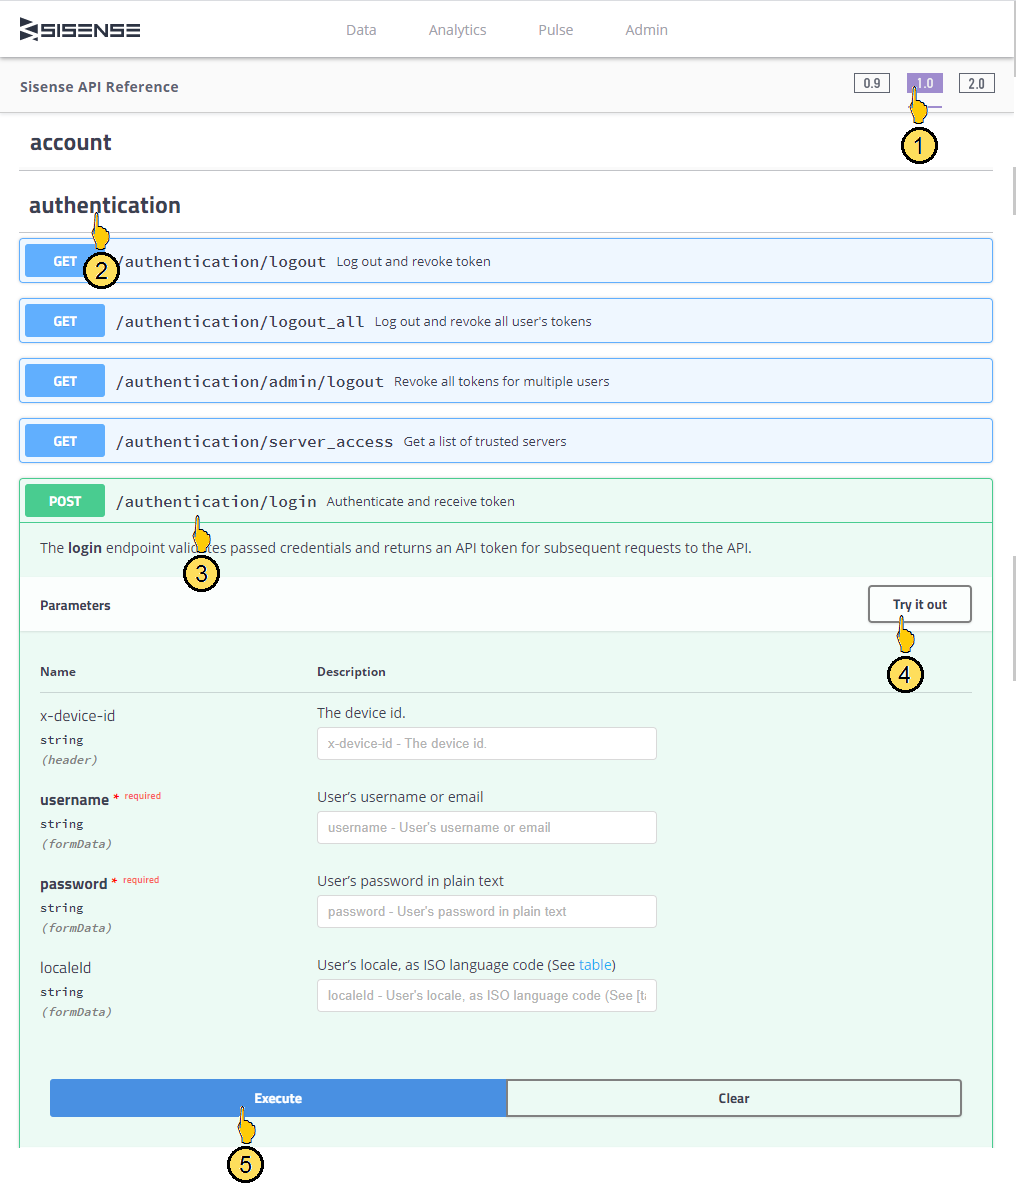
- In the authentication/login endpoint, enter the following details:
Body (Using x-www-form-urlencoded)
| Property | Value |
|---|---|
username | The username you log in to Sisense with |
password | The password you log in to Sisense with |
The resulting HTTP request should look like:
POST /api/v1/authentication/login HTTP/1.1
Host: example.com
Content-Type: application/x-www-form-urlencoded

username=user%40example.com&password=12345678
Note
The username must be URL encoded. For example @ should be written as %40.
You will then receive a response with your authentication token in a JSON response.
Code Example
Below is an example of JavaScript code that sends this request, using jQuery:
var settings = {
  "async": true,
  "crossDomain": true,
  "url": "https://example.com/api/v1/authentication/login",
  "method": "POST",
  "headers": {
    "content-type": "application/x-www-form-urlencoded"
  },
  "data": {
    "username": "user@example.com",
    "password": "12345678"
  }
}

$.ajax(settings).done(function (response) {
  console.log(response);
});
# Using the API token in requests
For every API call you must include the following header:
| Header | Value |
|---|---|
Authorization | "Bearer " + your token |
Note
There is a single space between "Bearer" and your token.
Example
GET /api/v1/some/api HTTP/1.1
Host: example.com
Content-Type: application/json
Authorization: Bearer eyJ0eXAiOiJKV1QiLCJhbGciOiJIUzI1NiJ9.eyJ1c2VyIjoiNTZiOWM3YTFiZGQ2YmViNDY1MDNjZWNlIiwiYXBpU2asdffaDU3N2QtODZiOC01MmU2LTQyOTYtYjIxZjk3NzhjZjYyIiwiaWF0IjoxNDYxNTgzNzc5fQ.vTB2fugl72db0tPr184tP5fd6e1SBZqDfYN2vedZOEY
# Using an HTTP request tool
# Postman
A popular tool for running REST API calls is Postman (opens new window) , which lets you run HTTP requests using a dedicated GUI. The HTTP requests can be executed to view the result, or saved as code snippets in a variety of programming languages.
- Select the method type and enter the endpoint in the URL field.

- Under the Header tab, in the Key field, enter Authorization .
- In the Value field, enter your the word Bearer and your User Token, which can be retrieved through the Post method authentication/login/ endpoint in version 1.0 of the REST API.

- Click Send . The response is displayed in the Body area.
# cURL
You can also use cURL (opens new window) from command line, or any other tool that can run HTTP requests with your headers and data.
The token you must include in the Header for version 6.0 and later is the User Token, which you can retrieve through the Post method authentication/login/ endpoint in version 1.0 of the REST API
curl -X GET --header "Accept: application/json" "https://example.com/api/dashboards" --header "Authorization:Bearer eyJ0eXAiOiJKV1QiLCJhbGciOiJIUzI1NiJ9.eyJ1c2VyIjoiNTZiOWM3YTFiZGQ2YmViNDY1MDNjZWNlIiwiYXBpU2asdffaDU3N2QtODZiOC01MmU2LTQyOTYtYjIxZjk3NzhjZjYyIiwiaWF0IjoxNDYxNTgzNzc5fQ.vTB2fugl72db0tPr184tP5fd6e1SBZqDfYN2vedZOEY"
# Conventions
Below we will outline some of the conventions used in the Sisense REST API. Please note that some of these conventions are only relevant to >0.9 versions.
# HTTP Methods
An HTTP request can be of the following 5 types, each explicitly defining the kind of result this request is trying to achieve.
# GET
GET requests are meant to retrieve data. When applied to a collection, such as users they will usually return the collection, and when applied to an identity such as users/someuserid they will usually return the entity this id represents.
# POST
POST requests are meant to create entities or perform actions.
A post request will contain an entity's data as it's payload, and it will be added to the relevant collection (for example, adding a new user).
Note that for most entities, such as users, there are validation rules preventing duplication (for example, it's impossible to add 2 users with the same user id) meaning that a second POST with the same user JSON will result in an error.
# PUT
PUT requests are a way to replace an existing entity. When passing an object via PUT if the entity of the same ID exists it will be replaced, meaning that if certain fields that existed previously are absent from the passed data, they will not be kept. This means that a PUT request's payload should contain all required fields of the entity!
# PATCH
PATCH requests are a way to update an entity without replacing it. The provided data will be merged with the existing data, so that only fields specified in the request will be updated and the rest will remain as they were.
# DELETE
DELETE requests are meant to delete an entity. Sometimes, it might be possible to DELETE an entire collection.
# Special Fields
The new Sisense API supports a standard set of fields for GET requests, allowing for increased flexibility in the way data is retrieved and used.
# Fields
Allows you to declare specific fields of the entity you're getting.
Can be comma delimited, without spaces, and - can be used for exclusion.
For example:
fields: "firstName,email"will get only the name and email fields of a user:
/api/v1/users?fields=firstName,emailreturns[{ "email": "user@sisense.com", "firstName": "you.ser" }]fields: "-hash"will get all fields of a user except for the password hash
Notes:
- If a field that doesn’t exist is passed, the request will not result in an error but rather will return an array of empty objects (in essence will return a value for each object with no fields)
- Passing both inclusive and exclusive fields in one request will result in an error code 500. For example,
fields:"firstName,-lastName".
# Sort
Allows you to sort the returned data by the specified field, where normally data is sorted in ascending order, and - indicated descending order. For example:
sort: "name"will sort users by their name, ascendingsort: "-name"will sort users by their name, descending
# Limit & Skip
These two fields allow you to get a specified number of results (limit) at a specified offset (skip), which is useful for server-side paging. For example: limit: 10, skip: 20 will return the third set of 10 results
# Expand
The expand field lets you define foreign-key fields which you would like to replace with their actual entities. For example, a user might have a property called groups, an array of ID's where each group is an entity in it's own. Using expand: "groups" we will get each user object with an array of actual group objects instead of their IDs.
This field can be combined with others (for example expand: "groups(fields:name)" will get only the name field of each group to replace the group ID) and can be nested (expand: "groups,groups.users" will get a user's groups, and their collection of users).
For example, the request
[
  {
    "_id": "552398f8e5fd8174a8000003",
    "active": true,
    "created": "2015-04-07T08:44:40.169Z",
    "email": "user@sisense.com",
    "firstName": "you.ser",
    "groups": [
      "562fb6bb479b8c3442000068"
    ]
  }
]
While
[
  {
    "_id": "552398f8e5fd8174a8000003",
    "active": true,
    "created": "2015-04-07T08:44:40.169Z",
    "email": "user@sisense.com",
    "firstName": "you.ser",
    "groups": [
      {
        "roleId": null,
        "name": "some group",
        "ad": false,
        "objectSid": "",
        "dn": "",
        "uSNChanged": "",
        "mail": "",
        "created": "2015-10-27T17:39:07.470Z",
        "lastUpdated": "2015-10-27T17:39:07.470Z",
        "_id": "562fb6bb479b8c3442000068"
      }
    ]
  }
]
# Errors
Errors returned by the new API have been standardized in structure, and will always contain the following properties:
status- an HTTP status code such as404or401httpMessage- the standard message for the HTTP status, such asNot Foundcode- the Sisense error code, which lets you identify the actual problem (see reference)message- a text message explaining the error code
Depending on the error type, other fields might be present. For example, for a not found exception, the fields resourceType and resourceName will be present, to indicate exactly what resource was not found.
An error example:
"error": {
  "code": 202,
  "message": "User 'd59665_athisisauserid6235_fs' not found",
  "resourceType": "user",
  "resourceName": "d59665_athisisauserid6235_fs",
  "status": 404,
  "httpMessage": "Not Found"
}