# Elasticube Plugins
# Introduction
Plugins let you add additional functionality to your ElastiCube builds, by adding .NET (opens new window) or Python (opens new window) code at the beginning and/or end of an ElastiCube build. Examples of what you can do include:
- Copy csv files from a remote location to your local machine before running an ElastiCube build.
- Manipulate and rename csv or Excel files before importing them into the ElastiCube.
- Send emails after a build finishes.
Availability
These plugins are only supported on the Windows OS version of Sisense
# Implementing with .NET
Plugins can be written in any .NET language.
# Setting up your .NET project
- Add a reference to
ElastiCube.PluginBase.dllin your project. - Add a reference to the .NET dll
System.ComponentModel.Compositionin your project. - Add an
ElastiCubePartattribute to your main Class:The first parameter is the plugin name as it will be used in the ElastiCube Manager. The second parameter determines if the build should fail if the plugin fails.[ElastiCubePart("MyPlugin", ExecutionTypes.ExecuteAlways, false)] - Your main class must implement the
IElastiCubePartinterface (referenced inElastiCube.PluginBase.dll). - Your plugin DLL file must be copied into the plugins folder in the installation directory: C:\Program Files\Sisense\Prism\server/plugins. Create the plugins folder if it does not exist.
# Plugin Code Example
using System;
using System.Collections.Generic;
using System.Linq;
using System.Text;

using ElastiCube.PluginBase;

namespace BuildPluginSample
{
    [ElastiCubePart("MyPlugin", ExecutionTypes.ExecuteAlways, false)]
    public class PluginClass: IElastiCubePart
    {

        #region IElastiCubePart Implementation

        public IElastiCubePartResult Run(IElastiCubePartArgs args)
        {
            // 0. Prepare the result object
            ElastiCubePartResult eCubePartresult = new ElastiCubePartResult();

            // 1. Get ElastiCube name
            string ecubeName = args.ElastiCubeXml.Elements().First().Attribute("ID").Value;

            // 2. Extract plugin arguments
            int myInt = Int32.Parse(args.Args.Attribute("MyInt").Value);
            if (myInt == -1)
            {
                // Setting IsTerminatingProcess = true terminates
                    the build after the plugin execution.
                eCubePartresult.IsTerminatingProcess = true;
            }

            // 3. Log operation
            args.EventLogger.WriteLog("myInt: " + myInt, "MyPlugin on ecube " + ecubeName);

            return eCubePartresult;
        }

        #endregion
    }
}
# Using the Plugin
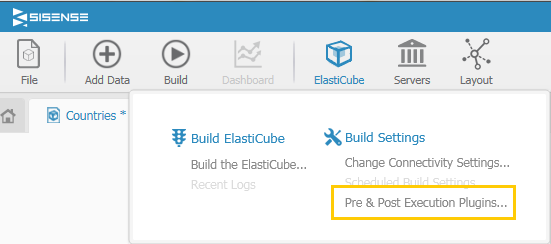
- Open your ElastiCube in the ElastiCube Manager, and click ElastiCubes > Pre & Post Execution Plugins.

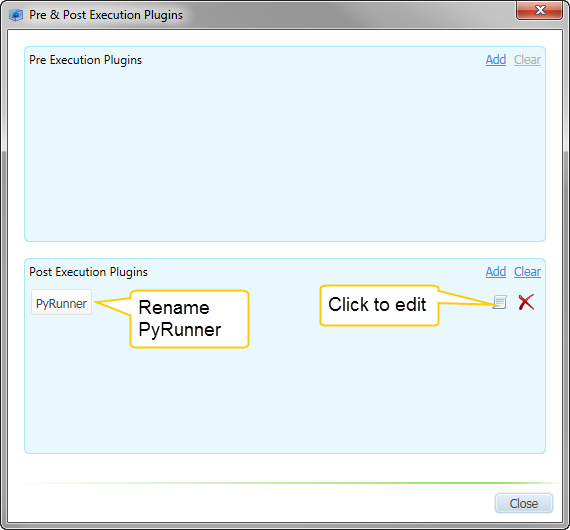
- In either the Pre- or Post-Execution Plugins, click Add. Rename the plugin to match the name you used in the Class attribute of your .NET project.
- Click the Edit icon to configure the plugin, and add arguments in XML form.
An example of how the arguments should be formatted:
<Attributes
	MyInt="4"
	MyString="Hello World" >
</Attributes>
You can then access these attributes from your .NET application using the args.Args.Attribute(name) method. Here’s an example in C#
int myInt = Int32.Parse(args.Args.Attribute("MyInt").Value);
You can use the same plugins for Pre & Post execution.
# Example
The post plugin below sends emails to a list of email addresses with the build status.
A completed DLL file for the code below can be downloaded: Post Plugin DLL (opens new window)
using System;
using System.Collections.Generic;
using System.Linq;
using System.Text;

using ElastiCube.PluginBase;
using System.Net.Mail;
using System.Net;
using System.Xml.Linq;

namespace PluginSample
{
    [ElastiCubePart("MyPlugin", ExecutionTypes.ExecuteAlways, false)]
    public class Plugin: IElastiCubePart
    {
        #region IElastiCubePart Implementation

        public IElastiCubePartResult Run(IElastiCubePartArgs args)
        {

            // 0. Prepare the result object
            ElastiCubePartResult eCubePartresult = new ElastiCubePartResult();

            // 1. Get ElastiCube ID
            string ecubeID = args.ElastiCubeXml.Elements().First().Attribute("ID").Value;

            //2. Get ElastiCube name
            string elastiCubeName = args.ElastiCubeName;

            //3. Get the "From" email address
            string fromEmailAddress = args.Args.Attribute("FromEmailAddress").Value;

            //4. Get the "From" name
            string fromPassword = args.Args.Attribute("FromEmailPassword").Value;

            //5. Get the "To" name
            string[] toEmailAddresses = args.Args.Attribute("ToEmailAddress").Value.Split(",".ToCharArray());

            //6. Get the email subject
            string emailSubject = args.Args.Attribute("EmailSubject").Value;

            //7. Get the email body
            string emailBody = args.Args.Attribute("EmailBody").Value;

	     //Update the email subject with the build status
            if (args.IsTerminating)
            {
                emailSubject = emailSubject + " - Build Failed ";
            }
            else
            {
                emailSubject = emailSubject + " - Build Finished Successfuly ";
            }

            //Iterating over the "To Emails" and send each of them an email.
            for (int i = 0; i < toEmailAddresses.Length; i++)
            {
                sendMail(null, fromEmailAddress, fromEmailAddress, fromPassword, toEmailAddresses[i], toEmailAddresses[i], emailSubject, emailBody);

                args.EventLogger.WriteLog("Sent email from: " + fromEmailAddress + " To: " + toEmailAddresses[i], "MyPlugin on ecube " + ecubeID);
            }

            return eCubePartresult;
        }

        #endregion

        private void sendMail(string attachmentFileName, string fromAddress, string fromName, string fromPassword, string toAddress, string toName, string subject, string body)
        {
            var fromAddressM = new MailAddress(fromAddress, fromName);
            var toAddressM = new MailAddress(toAddress, toName);

            var smtp = new SmtpClient
            {
                Host = "smtp.gmail.com",
                Port = 587,
                EnableSsl = true,
                DeliveryMethod = SmtpDeliveryMethod.Network,
                UseDefaultCredentials = false,
                Credentials = new NetworkCredential(fromAddressM.Address, fromPassword)
            };
            using (var message = new MailMessage(fromAddress, toAddress)
            {
                Subject = subject,
                Body = body
            })
            {
                if (!string.IsNullOrEmpty(attachmentFileName))
                    message.Attachments.Add(new Attachment(attachmentFileName));

                smtp.Send(message);
            }
        }
    }
}
You send arguments to your plugin in XML form by clicking the ‘Edit execution plugin arguments’ button on the right side of the window.
An example of how the arguments should be formatted:
XML Sample:
<Attributes
   FromEmailAddress="April.Mo@gmail.com"
   FromEmailPassword="My Password"
   ToEmailAddress="Mike.J@gmail.com,Daniel.S@gmail.com"
   EmailSubject="Build Status"
   EmailBody="My Email Body Here">
</Attributes>
In this example we used smtp.google.com to send emails.
# Implementing with Python
To create a plugin using a Python script, follow these steps:
Note: Python must be installed on your machine before beginning.
- Extract the PyRunner.rar (opens new window) file to C:\Program Files\Sisense\Prism\Server\plugins. You may have to create the plugins folder if it does not yet exist.
- Right-click the DLL file and click Properties. In the General tab, verify that the file is not locked. If it is, click Unblock.
- Write your python script and place it in the same folder (C:\Program Files\Sisense\Prism\Server\plugins).
- Open your ElastiCube in the ElastiCube Manager, and click ElastiCubes > Pre & Post Execution Plugins.
- In either the Pre- or Post-Execution Plugins, click Add, and rename the plugin PyRunner.

- Click the Edit icon to configure the plugin. Enter the the following XML:If Python is not defined as an environmental variable, or you need to redefine Python's location on your server, you can add the pythonPath attribute as shown in the example below:
<Config Program="yourfile.py"></Config><attributes Program="yourFile.py" pythonPath="C:\\Python27\\python.exe"></attributes> - Replace yourfile with the name of your Python file.
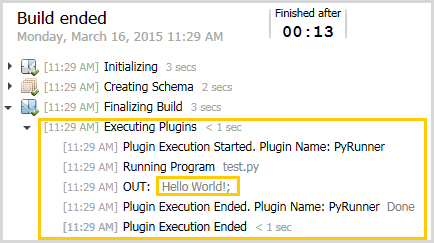
- Build the ElastiCube. You can see the result in the build log.
