# Building JavaScript Plugins for Sisense
# Before you begin
# Prerequisites
Before you begin developing Add-ons, make sure you have the following:
- A recent version of Sisense installed on your machine or
Admin permissions + file system access to a (dev/test) Sisense server - An IDE or text editor of your choice (such as Visual Studio Code, Sublime, etc.)
# Sisense Add-on Folder
All Sisense Add-ons are located in (and added to) a specific folder, at a predetermined location.
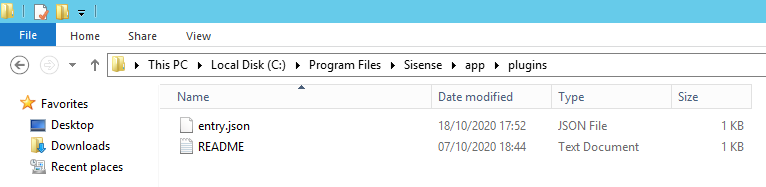
For Windows
The plugins folder is located at /app/plugins under your Sisense installation folder.
Usually, this is C:\Program Files\Sisense\app\plugins.
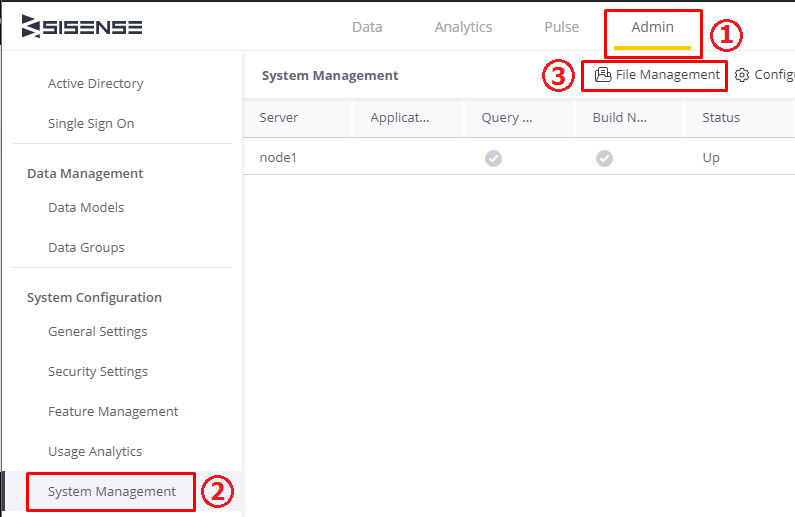
For Linux
The plugin folder is located in /opt/sisense/storage/plugins. It can be accessed via the File Management interface:

# Setting up for Add-on development
Normally, Sisense runs Add-ons through a minification process to reduce their footprint when loaded by the client.
However, when developing Add-ons you will want to see the plain source code in the browser's developer console.
For that, you will have to set your Sisense server into Add-ons development mode:
- Open the Add-ons folder (
/plugins) - Open the
entry.jsonfile in a text editor - Change the value of
isProdtofalse
For more information about entry.json, see entry.json reference
# Creating a new Add-on
TIP
You can do the following steps directly on the Sisense server, or do them locally and copy the code to the Sisense plugins folder.
The following steps will ignore the copying step for brevity.
To create an empty Add-on:
- Create a new folder in your Add-ons folder (
/plugins). Give it a unique name; In this example, we'll usenewPlugin - In your new Add-on's folder, create an empty JSON file called
plugin.json- this is the manifest files that tells Sisense how to process your Add-on - Now create an empty JavaScript file called
main.6.js- This will be your main code file. You can name it anything you like, as long as it ends with.6.js
# The plugin manifest
The plugin.json file is a manifest file that tells Sisense how to process and load your Add-on. The only thing you need to choose at this stage is a unique name for your Add-on. It is recommended that the name of the Add-on matches the name of the directory it is in, but this is not required. For this example, we'll use the name newPlugin.
Paste the following JSON into your plugin.json:
{
    "name": "newPlugin",
    "pluginInfraVersion": 2,
    "isEnabled": true,
    "source": [
        "main.6.js"
    ],
    "style": []
}
You can read more about the other properties of this manifest on the plugin.json reference.
# Main JavaScript file
You will now create your first code file, which will allow you to see that your Add-on's code is being executed by Sisense.
Add the following line of code to your main.6.js file:
console.log('Hello world!');
Since main.6.js already appears in your plugin.json's source array, Sisense will know this file needs to be loaded and executed in the client application.
If you refresh your Sisense browser tab and open the developer console, you should see the message above.
# Additional JavaScript files
Often, a single file isn't a good way to store all of your Add-on's code, and you may want to split it into multiple files.
There are several ways of doing that, however the recommended method is by exporting and importing modules.
Create a new JavaScript file called settings.6.js in your Add-on's folder, with the following content:
var settings = {
    message: 'Hello world, I come from another file!'
};

module.exports = settings;
Now replace the contents of your main.6.js file to:
import settings from './settings.6';

console.log(settings.message);
In this example, you've created an external settings module where your Add-on's configuration can be edited, and imported that module into your main code file.
# Adding CSS
You can import CSS files for your Add-on using either of two methods:
Using import
Use ES6 import syntax:
import * as style from './widget.css';
Using plugin.json
You can specify CSS files in the style section of your plugin.json file:
{
    "name": "blankWidget",
    "pluginInfraVersion": 2,
    "source": [
        "main.6.js"
    ],
    "style": [
        "widget.css"
    ],
    "folderName": "blankWidget",
    "isEnabled": true
}
# Using the Sisense JavaScript API
The Sisense Client exposes various client-side JavaScript APIs that can be used in Add-ons to further customize and interact with the Sisense UI.
# Using globals
The Sisense client application contains several global objects (on the window scope), the primary one being prism which we will use in this example.
The prism global is the main entry point for most Sisense JavaScript APIs. In this instance, you will use it to get information about the current user.
Replace the console.log line in your main.6.js file to the following line of code:
console.log(`Hello ${prism.user.firstName}!`);
When you refresh your Sisense browser tab, you should see this customized message in the developer console.
# Global events
The prism object exposes a method called on() which allows you to add event handlers to various global events.
In this example, you will use the global event dashboardloaded to output a custom message to console whenever the user opens a dashboard.
Add the following code to your main.6.js file:
prism.on('dashboardloaded', (event, args) => {
    console.log(`You have opened the dashboard: ${args.dashboard.title}`);
});
When you refresh your Sisense browser tab and navigate to a dashboard, you should see this message in the developer console containing the dashboard's title.
# Using API modules
While some of the Sisense JavaScript APIs are available either globally or contextually (as arguments of an event, for example), newer APIs are usually built as stand-alone modules that need to be imported into your Add-on explicitly.
This is done using the prism.getApi() method, which accepts the desired API module name and returns an object.
In this example, we'll use the HeaderAPI module to hide the Sisense logo from the application's header. Add the following code to your main code file:
var header = prism.getApi('api.v1.header');
header.hideLogo();
When you refresh your Sisense browser tab, you should see the header without a logo.
# Debugging
The easiest way to debug Add-ons is via the browser's built-in developer console, which is usually opened by pressing the F12 key on your keyboard.
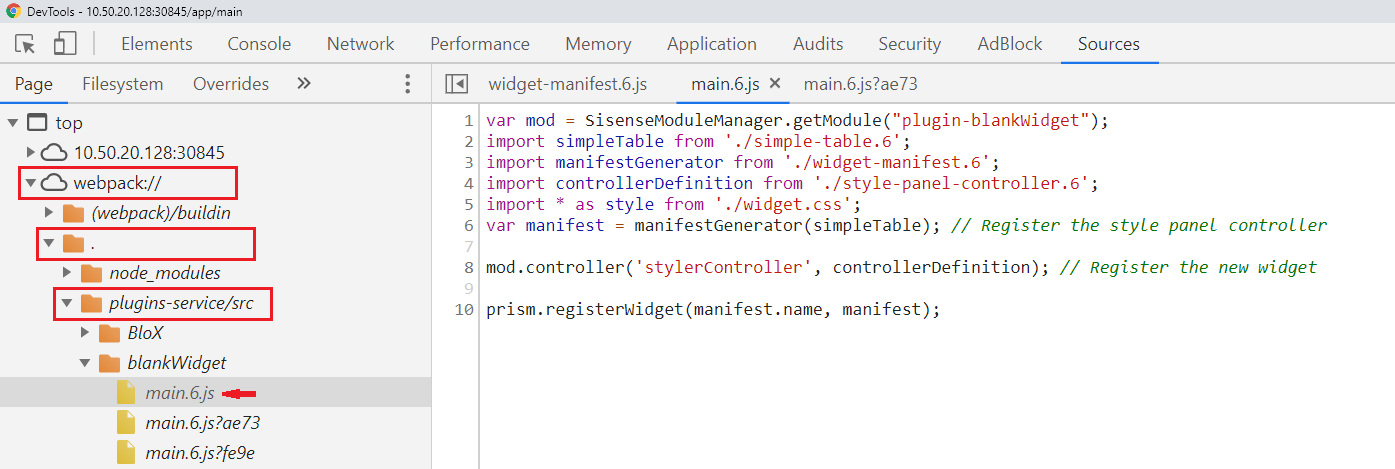
Your Add-on's code is served by Webpack using source maps. In order to locate your Add-on's code, navigate to:
webpack -> . -> plugins-service/src
Then locate your Add-on's name, and the code will be contained within it with the same file names you've used.
You may notice some additional duplicates of each files with a GUID suffix in their name - those do not contain any of your code and are internal loaders used by Webpack.
# Working with legacy Add-ons
Occasionally, you may need to debug or modify an older Add-on downloaded from the Sisense community, that uses the legacy Sisense Add-on infrastructure.
You can identify this type of Add-on by looking at the plugin.json file's pluginInfraVersion property - if the property's value is 1, it is a legacy Add-on.
These Add-ons have a handful of limitations:
- They do not support ES6 syntax, and you must write your code using ES5 syntax only
- All the source files are listed in
plugin.jsonas theexportandimportapproach cannot be used - The source files are processed and concatenated in the order they are listed